Thursday, September 4, 2008

Basil BLT with Havarti on Sourdough bread


Sorry it's been so long since I posted. I've been lazy and not cooking anything new. But this is Mmmmmmmmmmmm.... let me tell you! So, in honour of lovely in season garden tomatoes....


1) Cook bacon (unless your a vegetarian; then of course you'll want to skip that step) ;o)

2) Toast 2 pieces of buttered sourdough bread under the broiler

3) Add to one piece of sourdough:
  • little bit o' mayo
  • little bit of lettuce (on both sides keeps bread from sogging) i like the crunch of iceberg
  • tomatoes
  • salt & fresh ground pepper
  • LOTs of fresh basil (i like it chopped)
  • a thin slice of Havarti
Stick it under the broiler (to melt that havarti cheese)

4) Add to the other piece of sourdough:
  • little bit o' mayo
  • more fresh basil! :O)
  • bacon (if you eat it) i like to tear it into bite sized pieces
  • more lettuce
Smoosh sides together & chomp away,

Happy eating!
:O)
Mel

Friday, June 13, 2008

Pizza Dough Nirvana--Ingredient of the day


This frozen beasty......or......this homemade frozen yeasty?

(Okay, these pictures suck, but we ate it too fast to photograph. YUM!)

This pizza dough recipe is astoundingly perfect.
Warning!!! joyous raving rant of riotously happy taste-buds to follow:

Without exaggeration (Well actually with a helluva LOT of exaggeration but that's still not enough exaggeration) this is awe-inspiring. I have eaten a lot of pizza in my time. I'm originally from Ontario where there were many great pizza joints--which has caused me many a sad "sighhhhhhh" since I moved to BC. Here, (near Burnaby) I couldn't find a good pizza place at all. Now, I no longer need to. All is well!

The recipe was shared by Heidi Swanson of 101 Cookbooks. It was created by Peter Reinhart who wrote Bread Baker's Apprentice. The man is a genius.

Don't let the recipe's many pointers intimidate you; they are beyond handy. If I can do this, you can do this. I hadn't ever made a single pizza dough, yet it turned out so well that it was seriously the best thing I have ever eaten.


The six things you do that make it work so well:

  • Chill the flour in the fridge (I used all-purpose but purists say to get the best)
  • Chill utensils as you work (or your hand) in a bowl of cold water with an ice cube in it. SO worth the chilliness.
  • Let the dough sit in the fridge for 1/2/3 days (though after the 3 days, you need to freeze unused portions) The frozen crusts come out lovely, just defrost for a day.
  • Use a Pizza Stone & heat it first (mine is from Pampered chef & worth every penny--though I did get it free, haha from my BamBam (grandma) who got it at a garage sale.) I am considering buying a second one for entertaining though. It's a gem.
  • Fire up your oven as hot as it can go--safely ;0) 450 will work, but I like 525 degrees--I was giddy with joy when I saw that my oven goes to 550; you can't imagine!
  • Keep the fillings simple & high quality. (I'm usually a top it til it tumbles kind of girl, but great sauce, cheese, & pepperoni (or your favourite vegetarian topping) can't be beat for simple yummiousness.

One method for working with the dough, if it intimidates you (like it does me):

I'm awful at working with dough & transferring it to my hot pizza stone without calamity, so I developed this trick to get it to work. I make panzerottis instead of flat pizza.
  • Lightly flour & put pizza stone in oven (higher the better--cornmeal is awesome in place of flour) :0)
  • Use the bottom of another solid pan or large plate to build your pizza on.
  • Flour it and stretch dough out (don't be upset if your dough is very thin. The major problem with homemade they say is that the middle is tricky to get the dough to cook. The thiness doesn't burn amazingly enough (at least not in my experience) and it isn't undercooked. Nice crunch too.
  • Sauce the whole dough and build ingredients on one half
  • Fold in half to form panzerotti
  • Flatten edges of crust out well, so they'll cook evenly
  • Open oven and quickly turn the pan upside down to flop it onto your hot pizza stone
This really is way easier in practice, promise!

Enjoy!
:0)
mel

Friday, April 25, 2008

Sautéd Red Cabbage Salad (with tasty Greek influences)


I've made a solemn salad vow that is turning out to be scrumptious. This one was especially differently yummy.

I love cabbage and it's incredibly good for you, but sometimes when it's raw it's just too much. I wanted some colour in this salad for vitamins and cabbage keeps so well that it's a good standby. If you sauté it in a wee but of butter it makes a lovely salad topping. (Butter, I know 'bad,' but this salad is best enjoyed with a miniscule amount of salad dressing, so it's okay.) ;0) A little butter goes a long way in this: it lends the nicest creaminess to the nutty cabbage.

Sauté cabbage until it's al dente & adding sea salt helps keep the colour and pepper is wonderful with cabbage.
  • Start with your favourite green (this has romaine hearts & spinach-both organic)
  • Add the teeniest amount of finely-diced feta & spanish onions
  • Red cabbage goes on there too
  • Top with a hit of your favourite herb (I had basil on here & it was wondrously good)
Dressing suggestion: Greek. Nice. :0)

Happy eats!
Mel

Thursday, April 24, 2008

Ingredient of the Day: Infused Oil & Vinegar


Infusing oils & vinegars is so simple it'd be laughable if it didn't add so much to cooking. They add such a depth of flavour to salads, vegetables, or anything you use oil or vinegar for, (hahaha.) They also make lovely gifts. You can tailor your recipes to the favourite tastes of friend & loved ones.

This particular oil blend has:
  • Lots of lemon zest
  • 3 garlic cloves crushed
  • Lemon scented thyme (crushed to release oils)
This 'recipe'--if you can call it that ;0)--was born, because I really wanted garlic flavour on some roasted potatoes, but I didn't want the burnt taste of overdone garlic pieces. If you use it right after mixing it is very subtle (garlic-wise.) If you want strong garlic flavour right away, or you aren't worried about burning, just chop the garlic cloves just mash 'em with a garlic press or fork.
You can use different oils, of course, so it's adaptable and healthful.

I've tried a spicy rendition for Christmas gifts that was very well received just by combining:
  • Extra Virgin Olive Oil
  • A few chili pepper flakes
  • Garlic cloves (peeled & crushed)
  • & Rosemary
Any herb you like is great. The woody herbs (like rosemary, thyme, sage...) seem to keep longer but tarragon, dill, cilantro, chives, green onions...and so on...impart lovely flavours. I've been salivating over the idea of an oil infused with my new curry plant (though I've read it's more fragrant than flavourful...we'll see. I'll let you know...)

Other great flavours are: ginger, lemon grass, bay leaves, kaffir lime leaves, dill seed, fennel seed, celery seed, Fenugreek, cumin, clove, cumin...well really any spice, heehee :0) Many will be best cut (lemon grass) crushed or grated.

Keeping your concoctions in the fridge ensures there's no unwanted bacterial business from the herbs...The vinegars are naturally antibacterial so they last longer unrefrigerated.

Vinegars, even the cheapest, are really improved by adding aromatics. Blends are nice too: A mix of white vinegar with red wine vinegar gives you that rosé colour, but is clear enough that it still lets the herbs show to their best advantage. I really like the flavour too. White balsamic vinegar is simply dreamy and so attractive. You can choose all kinds of pretty bottles for gifts--or for you! :0)

Happy easy culinary alchemy,
:0)
Mel

Homemade Roasted Peppers & Yogurt cheese in a Sandwich


The star of this ultra fresh-tasting sandwich is an orange roasted orange pepper. Roasted peppers are easy to make at home & they're juicier as well as sweeter than the jarred variety (the jarred ones always seem to go moldy on me.)

With fresh ones, you control the texture, since you can cook them as much or as little as you like. Plus--obviously--you can roast orange or yellow ones (or even hot peppers) for different flavours. I would find green bitter, but whatever floats your culinary boat...

It's also a great way to save those almost wrinkling peppers from certain doom. I just roasted this orange one (who was in his old age) in the oven at 500 degrees (while I was cooking turkey.)

The skin peels right off (easier when cooled-I tried it when hot, ooouch! ) You don't even need to blacken the pepper (unless you want it really roasted-- I like it just brown it in spots because it leaves the teensiest crispness to the pepper. Once roasted, they save nicely in the fridge for a day or two. You can freeze your roasted peppers, marinade them, or immerse them in a jar of oil.

This sandwich also includes another easy easy easy 'gourmet' gem:

Homemade Yogurt Cheese


Did I mention this was easy?:
  1. Just take yogurt (with no settling agents in it.) I used a natural Balkan style & it turned out lovely (smoother than other yogurts.)
  2. Put the yogurt in cheese cloth and set that in a sieve.
  3. Set the sieve over a bowl & Let the water drip out (refrigerating all the while)
  4. When the water is out and the yogurt is firm it's done (overnight is perfect, but you can check the texture & taste it
Cream cheese consistency is how like it. Yogurt cheese is great for those who like a rich tzatziki (me!) and it is a fantastic tangy but light tasting addition to wraps / dips / mashed potatoes / wraps / sandwiches...Which brings me to the actual sandwich; It's on buttered white toast (gasp!), but that's all I had, and I needed a sandwich fix. Its fillings include:
  • Yogurt cheese (herbs added to this are loverly)
  • Roasted orange pepper
  • A little mayo
  • Salt & Pepper
  • Sorrel (lemony wonder) & iceberg lettuce (or your favourite greens)
  • a sliced left-over chicken thigh
If you're a vegetarian, you could add avocado for a little richness instead of the chicken.

Happy cooking adventures!
:0)
Mel

Tuesday, April 22, 2008

Club sandwich Salad (a crunchy green take on the sandwich)


This picture is a cheat, because it's a bread-less version of this club salad recipe--with red pepper as a substitute for the tomatoes. Hardly the same, but kinda perty, no? It also has fresh dill and sorrel. (Sorrel is an unusually lemony perennial green that is delightful. I grow it in a pot.) :0)


Being a club sandwich fiend this is my favourite salad:
  • Lettuce (a mix of Iceberg or Romaine for crunch with organic salad greens like mescaline mix or baby spinach is scrumptious and a good way to introduce greener varieties of lettuce to kids)
  • Bacon Cooked 'til it's the crispness you like (avoid bacon bits like the plague--> they are evil! Muhahaha!)
  • Tomatoes (if you don't have fresh canned finely diced are nice)
  • Chicken or Turkey (For best results, put poultry in a ziplock bag and flatten it with a meat hammer until even. Cook 'til tender & moist, but not overdone of course!) ;0)
  • Havarti or old /medium cheddar (or your favourite cheese)
  • Green onion (fine chop)
You could use shrimp/crab/scallop as well or instead of poultry (seafood club, right?)
Avocado is awesome too (large cubes lightly salted.)

For entertaining friends who are Vegetarians: You could make a salad bar that includes the above, but also has chickpeas (Garbonzo beans--which are lovely toasted.) Other options include pine nuts, spiced pecans, pomegranate seeds...

Dressing:

I love this best topped with Ranch dressing (to which I add a shot of white balsamic vinegar & fresh herbs) or a with any mayonnaise-y vinaigrette. The pow of vinegar is the best! (TIP: If you can let your homemade dressings sit for at least an hour/overnight for flavours to marry.)

Homemade Sourdough croûtons:

If you hate store bought croûtons, like I do, you may be pleasantly surprised by making your own tasty morsels.

Butter & a little cooking oil
Sourdough (or other fresh bread)
Sea Salt
Freshly ground pepper
Pinch cayene
Paprika/other spices you like
Lemon/lime zest
Flat Leaf Italian Parsley/Cilantro/Dill or finely chopped Herb of your choice
Garlic

Add the ingredients in the order above (most important is the garlic last to avoid burning it bitter.) Toast it. This makes crispy croûtons with a soft warm inside. Mmmmm....

Thanks for looking. Happy Cooking,
:0)
Mel

Monday, April 21, 2008

Red Cabbage Coleslaw with fresh Dill


The key to this coleslaw is to add more vinaigrette than mayonnaise (unless you like it the other way 'round.) The zingy vinegar & onion against the nutty cabbage & sweet carrot is nicely accented by fresh pepper and a touch of creamy mayonnaise.

  • 1/2 small Red Cabbage Finely chopped
  • 1 large carrot shredded (or add more to taste)
  • 2 green onions finely chopped
  • 3 tbsp balsamic vinaigrette (or more to taste)
  • 2 tbsp real mayonnaise
  • 1/2 tsp or more white balsamic vinegar (or dark balsamic or other vinegar)
  • Liberal amount of fresh ground pepper (to taste)
  • Handful Fresh dill-chopped

Mix everything.

Couldn't be easier. Chops well in a food-processor also. This is lovely the next day... the flavours marry nicely. You may find you need to add a little more dressing & vinegar to get the same flavour kick.

Other flavour options:

If you can get your hands on Kohlrabi, Fennel, or Celeriac try a little in here too. :0) Kohlrabi is amazingly yummy. It's not that hard to grow from seed either.

Dry mustard
Optional add fennel seed

Enjoy!
:0)
Mel

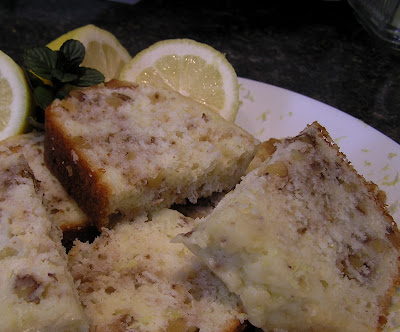
Lemon Walnut Bread


This lemon bread recipe is from Better Homes and Gardens New Cook Book It can have subtle lemon flavour, or you can boost it by adding more lemon zest & juice. It makes 1 large loaf or 2 small loaves (16 servings.) I love to serve it with lemon zest sprinkled all over the plate, so I can get as much lemon as possible.

TIP: If you're using the juice of a lemon but not the zest in a recipe, zest it first anyhow. If you zest onto a piece of plastic wrap you can freeze it for later. Also, rolling a lemon on the counter will make sure it gives up all of its juice. :0)

Ingredients:

  • 1-3/4 cups all-purpose flour
  • 3/4 cup sugar
  • 2 teaspoons baking powder
  • 1/4 teaspoon salt
  • 1 beaten egg
  • 1 cup 2% milk
  • 1/4 cup oil
  • 1-2 tablespoons lemon juice
  • 2 teaspoons finely shredded lemon peel (I like 3 or 4)
  • 1/2 cup chopped walnuts (or pecans/almonds) , toasted
Glaze:
  • 1 tablespoon sugar (either granulated or powdered icing (confectioners) sugar
  • 2-3 tablespoons lemon

Directions

Preheat oven to 350 degrees

1. Grease 8x4x2-inch loaf pan or two 7-1/2x3-1/2x2-inch loaf pans. Set aside.

2. In a medium bowl, sift together dry ingredients :

  • 1 3/4 cup flour
  • 3/4 cup sugar
  • 2 teaspoon baking powder
  • & 1/4 teaspoon salt
3. Make a well in dry ingredients
4. In another bowl, mix wet ingredients
  • 1/4 teaspoon salt
  • 1 beaten egg
  • 1 cup 2% milk
  • 1/4 cup oil
  • 1-2 tablespoons lemon juice
5. Add to dry ingredients (in the well you made.) Stir until just mixed. Batter should be lumpy, otherwise it'll be tough.

6. Fold in nuts and lemon zest:
  • 2 teaspoons finely shredded lemon peel (I like more: 3 or 4)
  • 1/2 cup chopped walnuts (or pecans/almonds) , toasted

7. Pour batter into prepared pan(s) and spread evenly. Bake in a 350 degree F. oven about 50-55 minutes for 8x4x2-inch loaf and about 45 minutes for 7-1/2x3-1/2x2-inch loaves or until a wooden toothpick inserted near center(s) comes out clean. (If necessary, cover loosely with foil for the last 10 to 15 minutes of baking to prevent overbrowning.)

8. The sauce: While baking the bread, in a small bowl stir together 3 tablespoons lemon juice and 1 tablespoon sugar until sugar is dissolved. Right after the bread comes out of the oven--while still hot--spoon glaze over top(s). Cool in pan on wire rack for 10 minutes, then remove from pan and cool completely on the wire rack. Wrap in plastic wrap and store overnight before serving.

Make-Ahead Tip: Bake loaf or loaves. Glaze, then cool completely. Wrap in foil or plastic wrap and store in the refrigerator up to 2 days. Or, place cooled loaves in freezer containers or bags and freeze up to 1 month. Thaw overnight in the refrigerator.

Happy Baking,
:0)
Mel


Thursday, April 17, 2008

Peanutbutter Oatmeal Cookies with roasted almonds


These freeze well as rolls in plastic wrap, then you can slice off rounds and bake them super quickly.

Oatmeal Peanut butter cookies
(like girl guide ones) 5star rating by 215 people online

  • · 3/4 cup all-purpose flour
  • · 1/2 teaspoon baking soda
  • · 1/4 teaspoon baking powder
  • · 1/2 teaspoon salt
  • · 1/2 cup butter, softened
  • · 1/2 cup peanut butter
  • · 1/2 cup white sugar
  • · 1/2 cup packed light brown sugar
  • · 1 egg
  • · 1 teaspoon vanilla extract
  • · 1 cup quick cooking oats
  • · 3 tablespoons butter, softened

FILLING: 1 cup icing sugar & 1/2 cup smooth peanut butter & 2 1/2 tbsp heavy whipping cream

BOWL 1---In a large bowl, cream together:

  • · 1/2 cup butter
  • · 1/2 cup smooth peanut butter
  • · ½ cup white sugar
  • · ½ cup packed light brown sugar
  • · And 1 tsp vanilla.

---Add egg and beat well. BOWL 2---In another bowl, Sift & combine:

  • · ¾ c flour
  • · 1/2 tsp baking soda
  • · 1/4 tsp baking powder
  • · 1/2 teaspoon salt

Add these sifted dry ingredients to the creamed mixture. Stir. Add 1 cup oatmeal & Stir in ½ cup almonds (chopped and toasted)

Drop by teaspoons onto greased baking sheet, and press each mound down with a fork to form 1/4 inch thick cookies. Bake at 350 degrees F (175 degrees C) for 10 minutes, or until cookies are a light brown.

(I made the ones above without filling, so I can't say how this is:)

BOWL 3--To Make Filling: Cream 3 tablespoons butter with 1 cup icing sugar, add 1/2 cup smooth peanut butter, and 2 ½ tbsp heavy cream. Spread filling onto half of the cooled cookies, then top with the other half to form sandwiches.

Recipe from here

Wednesday, April 9, 2008

Easy Casserole style Spanakopita


Charles gave this easy casserole style Spanakopita ten out of ten, and insisted it was company worthy. I loved it too...for some reason spinach by itself feels funny on my teeth, but this is a dream to eat. Popeye would approve!

It is such a satisfying dish that you need no meat (the egg adds protein of course.) It's a wonderful vegetarian entertaining option. This is perfect balanced with a lemony balsamic-dressed salad to refresh your palate. I like to sprinkle the dinner plate with fresh lemon juice & fresh ground pepper, so that every once in a while you hit a taste of it. Lemon wedges let your eaters add more if they like. :0)

To make it:

1 large bunch spinach Well washed--remove much of the stems & cook with a little olive oil and the 'aromatics' (or you can use two frozen packages squeeze to drain.) After cooking the spinach drain it.

Aromatics:

  • Spanish Onion (1/2 medium sized one) I save some to add to the filling right before assembly
  • Cilantro (handful fresh chopped) (or dill)
  • 1 clove garlic finely chopped
  • Grating nutmeg (equivalent of 2 pinches) I add some during cooking and some before assembling
  • Fresh Lemon zest (2 tsp or so)
  • Pinch or two salt & lots of fresh ground pepper
Mix in with the above:
  • Aprroximately 150 grms (3/4 cup or so) Feta cheese
  • 1 egg
  • bit more fresh nutmeg
  • a bit more of the finely chopped onion
  • more fresh cilantro (or dill)
  • more lemon zest
Preheat oven and Layer in a casserole dish:
  • 1st: Phyllo pastry sheets (I use 3-4 layers on the bottom; it is not important if the sheets break, but melted butter brushed on them is key. I use my hands to put it on. No need for a brush)
  • 2nd:Add bread crumbs between layers
  • 3rd: Spoon in and spread filling
  • 4th: Add more bread crumbs
  • 5th: Add the 3-4 layers more lightly buttered phyllo on top. (Butter top layer well)
  • 6th: Add more bread crumbs
  • 7th: Sprinkle with Nonya seasoning
Bake at 400 degrees for 1/2 an hour (or until golden brown)

Don't have bread crumbs?

Take a bun/bread (I just LOVE sourdough bread) and put it in the microwave for a minute or so--or oven (until it's overheated.) Then just let it harden & grate it. I like that the bread still tastes fresh, not stale, and that you can make it quickly. Don't even have bread? Use well-crushed crackers. Ritz are nice and buttery.

If you cut slits in the top it lets the steam evaporate so it's not too moist:

I found that the slits closed during baking, so I just used a spatula to open them 1/2 way through cooking.

You can fold your phyllo into the traditional shape of spanakopita bundles instead OR roll it, chill it, and cut it to make appetizers. It freezes well and reheats nicely in the oven (though you may want to sprinkle a little butter on top before reheating to keep it from drying out.)

Happy cooking! Happy eating!
:0)
Mel

P.S. Roasted Feta looks GOOD

Tuesday, April 8, 2008

Roasted Beet, Avocado & Asian Pear Salad


This is YUMMMMMMy! It's easy, and very good for you too. It's even pretty. It's nicest prepared fresh, and tossing it just makes the redness of the dressing even more appealing. The thing I love about it is the contrasting/complimenting textures. The earthy smoothness of the beet against the crispness of the Asian pear. The slightly bitterness of the crunchy romaine against the creamy avocado and the buttery crunch of pine nuts. Tasty!

If you don't enjoy fruit in salads, you may very well still enjoy the Asian Pear. You'd be surprised how subtle it's sweetness is and its moist crispness can't be found in anything else.

Beets With a bit of Zip:

I love pickled beets, so to bring out the sweet note of beets & to add a zing, I thought why not bake them with vinegar:
  1. Peel & chop beets; (baby beets are nicest)
  2. Blanch them (drop into boiling water for 30 seconds then put into ice water)
  3. Wrap them in tinfoil--drenched in vinegar, oil, sea salt & fresh pepper (to taste) Even white vinegar is great, but balsamic is lovely. (The tinfoil keeps the skins tender for the salad. If you want caramelized beets with a slightly drier skin, opt for a pan & no tinfoil.) :0)
  4. Roast beets at 375 to 400 degrees until tender. (Depends on the size you chop them)
  5. Chop them smaller for salad or eat 'em as is. They keep well.

The rest of the salad:
  • Organic Romaine Hearts washed & torn (or any lettuce/salad greens but crunch is nice)
  • Avocado diced (I half it, remove the pit, & dice it in the rind then scoop with a spoon=no washing up.) I think lightly salting the avocado is key.
  • Asian Pear peeled and chopped
  • Toasted pine nuts
  • I like to make my own dressing, but in a pinch Newman's Own Balsamic Vinaigrette is my favourite store bought dressing.
You can substitute roast carrots/sweet potatoes for beets.

Other delectable substitutions/additions could include:

  • Cheese (A natural with this) Goat cheese, creamy feta, old cheddar, blue cheese... (or your favourite)
  • Spanish Onion (was all out or it would have gone in finely sliced- for sure!)
  • Cilantro or Italian Flat Leaf Parsley (nice against the creaminess & sweetness)
  • Other Toasted Nuts: walnuts, pecans, almonds or macadamia nuts<--(one of my faves in salad)
  • Other Fruits: crisp pear...granny smith or gala apples... Or plums/strawberries/raspberries (with a little lemon/lime/grapefruit juice)
Happy cooking,
:0)
Mel

Tools I Couldn't Cook Without: My Zyliss Salad Spinner +A Healthy Trick for Cleaning Produce


I left my ex-husband our salad spinner in the divorce, so I had to go out and get a new one right away. This is my current Zyliss Salad Spinner. The first one had a lid that you could use to convert the spinner for fridge storage (lucky guy!) ;0) So if you're in the market for a salad spinner & you can find the one with the lid--go for it. If not, you can still store with the lid of this one. It pulls like a lawn mower, smooth and fun! Just hummms away. I eat so much healthier when I don't have to towel dry lettuces. It's a great way to get kids involved in cooking; there more likely to A) help in the kitchen & B) eat the salad they made.

It also allows you to soak the lettuce for a while, which is nice if you can't buy organic, or if you want to perk up lettuce with cold cold water. I just tear lettuce roughly and fill with cold water. Pull the basket up and dump the water. Put the basket back and spin away. You can clean other veg in there too. :0) Adding a paper towel on the bottom of the basket for storage makes the lettuce last longer. (It gets damp from the lettuce & prevents it from dehydrating.)


Salty fruit???

After I soak fruit/veg, I scrub 'em clean with a brush and salt. Then rinse 'em.

  • Salt is naturally anti-bacterial (So it's great for things like cantaloupe which can harbor salmonella (source & more info)
  • It doesn't affect the flavour. In fact, some people like to add salt to fruit: apples for instance.
  • It's mildly abrasive, so it removes things like wax.
  • Salt is especially good for cleaning produce you eat/use the peels of like potatoes and citrus: it gets in those little divits!
Happy eating,
:0)
Mel

Wednesday, March 12, 2008

Some Great Links

When you can, buy these organically grown:

"Foods with the most pesticide residue are: strawberries, peaches, raspberries, blackberries, grapes, cherries, apples, and celery. Imported produce is also more likely to contain higher levels of pesticides" (source)

Educational Nutrition Links:

The dirty dozen (most contaminated)
Levels of pesticides
Top foods to buy organic
10 top pesticide foods

10 super healthy foods
10 power foods
Food Timeline
Dehydration & You

Funny & potentially useful:

Speed peel an egg
Speed peel a banana
Speed peel a potato
2 minute beverage chilling
Quick pop bottlecap
Fast pour ketchup

Fun for kids:
Instant Sorbet

:0) Mel

P.S. I tried the egg thing and blew chunks of yolk all over. It was such a silly thing to do that I laughed my @$$ off (<--oh I'm bad!) hahaahahaha and I didn't try it a second time. How brave are you? I love to hear about it if you get it to work.

Tuesday, January 8, 2008

Tools I Couldn't Cook Without: Microplane & Ikea Bowl Grater


I love this sucker! This microplane grater from Lee Valley Tools is an astoundingly good product. (Long skinny grater at left in picture.) It was originally created for woodworking, but has since become famous for its high quality grating of citrus zest, spices like nutmeg, Parmesan cheese etc... I introduced it to our friend Billy (who is a chef) and he loves it too. It's available with a cover that you can buy separately, but I don't have one. I just grate directly into the bowl and just store it safely against the side of a drawer. I found it worth the $14.00 (Note: I'm not affiliated with Lee Valley; I just love this thing.)

Sometimes you get an amazing product for a really great deal ($4.99 for two!) This bowl style grater from Ikea is just such a bargain. I love the bowl with its non-slip bottom (and the lid that keeps your grated bits fresh.) The grater has stayed sharp through lots of dishwasher cycles and even grates carrots (I go in circles with the carrots and it grates SUPER fast.)

:0) Mel

P.S. [Disclaimer: While I am not sure how I feel about Ikea's production politics (and I'm sometimes upset by poor quality of a select few of their products) I'm not in a budget-position that can always afford supremely ethical purchasing--one day...]

Tuesday, January 1, 2008

Ingredient of the Day: The Lovely Tomato (aka Love Apple)

This year, we were lucky enough to be given these canned homegrown tomatoes from C's Dad. (He also makes us mini pizzas with an amazing tomato sauce that is a reduction of the clear liquid that he saves from the tomatoes during canning<---HOT tip that; hope he doesn't mind me sharing his secret!) ;0)

Did Ya Know?: the forbidden fruit in the Bible was never specifically named as an apple. Perhaps it was a pomegranate (of Persephone fame) or maybe it was a tomato!?! lol. They were originally called love apples. Also, Brits first thought the tomato was poisonous (the leaves certainly are...) A number of people are allergic to tomatoes. The plant is in the nightshade family, which includes the Tobacco plant--and of course eggplant, peppers... [More about the history of the tomato here.]

Much thanks to this site for this photo.

Apparently, the peak of tomato nutrition is "achieved on the vine just hours before they are overripe" so growing your own is the very best. (Source.) The thing I find most interesting about tomatoes: they taste better (and are better for you) canned. Tomatoes are one of the best foods for flavour without low-fat, and with vitamins. They're rich in Lycopene: an antioxidant. (The canning/cooking process actually makes the good stuff more accessible to your bod!) More here.

If you're a purest and you want to avoid tinny taste, you can can your own in glass canning jars like my F.I.L. I haven't done my own canning for a couple years (we keep meaning to have a canning party--maybe this summer...) I have to try canning a little-known tomato gem that my mouth keeps remembering (and missing!): my Bam Bam's (my Grandma's) pickled whole green plum-tomatoes. I'll post the recipe here, if I can coax it out of her--and if I can get it to work well. ;0) I don't blog recipes until I've tried them, but in case you can't wait: here's a few links for pickled green tomatoes.

And here is a recipe I have tried (and love love love!) It's an unbelievably EASY snack or appetizer:

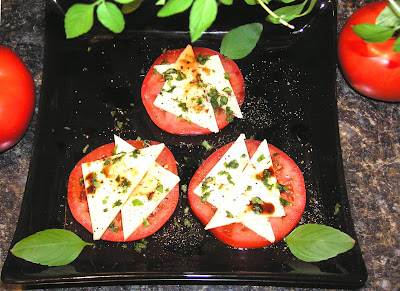
Tomatoes with cheese & fresh Basil:

Ingredients:


Tomatoes
(store out of fridge to retain the best flavour & texture.)
Cheese of choice:
Havarti, Mozzarella or Bocconcini
Olive Oil (Your favourite) & Balsamic Vinegar (dark or white)
Salt & pepper (fresh ground)
Fresh Basil
(or Oregano, Cilantro or Thyme)

Super-dee-duperdy EASY Assembly:

1. Slice tomatoes.

2. Add Havarti or your cheese of choice (room temperature cheese is loverliest!) I love Havarti (but you can use any cheese that you enjoy. This is inspired by friends of ours who make it traditionally--and fabulously--with Mozzarella or Bocconcini.)

3. Season (salt & fresh pepper to taste.) Sprinkle chopped Basil and drizzle on a great olive oil. (I like to garnish with extra Basil leaves, so people who really like Basil can just add their own.) You can even use Oregano or Cilantro leaves instead--they're are also natural pairings for tomato. Thyme is good too! I finish by adding a drizzle of Balsamic Vinegar.

Enjoy! :0)

More of my favourite recipes with tomato:

Salsa (of course)--Which is also great in seven-layer Mexican dip
or Taco Supreme Salad

Fresh Salsa & Roasted Almond baked goat cheese (yummmmmmmmy!)

and of course it's great in curries, chili, and spaghetti sauce. (Recipes to follow in the new year.

Tools I Couldn't Cook Without: Getting the most out of spices with a Mortar and Pestle

I love to use a Mortar and Pestle. It brings out the best of flavours. There are many many varieties available, but I love these two (although I do want a glass one with the frosted glass, just out of purely aesthetic commodity fetishism--> translation: I love the pretty things! heehee.)

The small one is just your average marble one. I like to put my hand over it (like an inverted cup) when doing things that hop-- like peppercorns or coriander. The larger one was a purchase inspired by my family friend Nee--who lives in Thailand and visits occasionally (when she makes the World's most aromatic sauces and dressings in a big one like it.) So when I saw it at Granville Island Market I had to have it. It was surprisingly affordable.

I wouldn't be without my mortar and pestle for crushing spices, bringing out the oils in herbs and spices (even premixed seasonings benefit from a grinding!) It is also indispensable for marrying (smush-smashing!) garlic and herbs and spices and oils and other lovely saucy bits. However, if you can't afford a mortar and pestle, just use you hands to rubs the mixes of seasonings (better than nothing and it leaves nothing to wash up after.)

Thanks for lookin' & happy cookin'!
:0) Mel

Tools I Couldn't Cook Without: Cast Iron & Magnetic Knife Holder

My Dad and Charles's Dad have taught us well. They are masterful cooks who wouldn't dream a kitchen that had no cast iron. Neither would I! Besides leaving no teflon in your system, it just makes food taste soooooo good. Cast iron has the great advantage of being able to withstand very hight heat (won't warp like all of my non-stick pans.) It goes from the stove top to the oven, and it conducts heat very evenly.

Some basic ways to care for your cast iron:

1. Raise your right hand and repeat after me: "I solemnly swear to keep my cast iron seasoned." If you do, it will never stick! You can even wash it with soap & water if you keep it well seasoned and oiled. However, NEVER let water sit in it. I prefer to wash it with boiling water and oil it (only occasionally soaping it.)

2. Seasoning your cast iron: Oil it and put it in the oven to season. I use Canola oil (it has a higher smoke point and doesn't turn into trans fat like olive oil does.) I just preheat the oven to 250 degrees and check it occasionally--sticking a wooden spoon it the oil to be sure it doesn't congeal.

Here's a fantastic write up on cast iron. Interesting cast iron fact: it actually adds iron to your diet. To get the full benefits of this cook tomato sauces in it; they pull the iron out more.

Magnetic Knife Holder:

$10 bucks at Ikea equals sharp knives and a happy cook!!! 'Nuff said. :0)

Over the holidays, I cut my finger chopping carrots with a dull knife (forgot to bring my own to a cabin we rented, duh!) Granted, Lemon Drop Martinis were involved (recipe to follow after I perfect it.) ;0) However, I still blame the dull knife. I have had the occasional tipsy kitchen adventure and I never cut myself. Wouldn't live without a great way to store knives: cooking is more enjoyable when your tools are sharp.

Mel

P.S. I'm not affiliated with any of the makers of this schtuff--I just likes it! :0)

The Flame! Silver Sage 2004

Our great friends Matt & Nadia introduced us to this aperitif wine (and then were sweet enough to give Charles a bottle as a graduation present.) He loves hot foods (unnaturally hot foods)-- especially the delight that is Curry. I'm a Mellowish Madras kind of girl (recipe to follow in a post later) He's a Vindictive Vindaloo man. (Hurts!!!!) ;0)

So, characteristics of this wine: sweet and hot. Ha! I'm such a conoseur, hehehe. It's 14% Made in Canada, Baby! (At the Silver Sage Winery in Oliver BC.) On a heat scale of 1 to 5 it's around a 3.5 to 4. The bottle says that The Flame has: "a rich bouquet of peach and appricot natural aromas and the unique hot pepper spice." They suggest pairing it with meat and seafood; wouldn't go with a curry, I imagine.... I would drink it while nibbling appies: cheese and baguette (perhaps cold cuts or shrimp if you are not a vegetarian) to cut the heat.

Niftiest thing about this wine: the pepper goes up and down in the bottle--depending on the temperature of the wine!

:0) Mel

Crazy Eggs: Scrambled Nest

This is a little odd, but if you like scrambled eggs and you like sunny side up (or "dippin' eggs") but aren't so big on the whites, then you're sure to like it. (I've probably just described 1% of the egg-loving population of the world, but hey, if you're out there... then this is for you!)

How to:

--Put eggs in a bowl (Leave out one yolk per person, but leave enough yolks in to get your scramble the way you like it.)
--Beat eggs well (lots of air is good.)
--Add a tiny bit of cold water and beat more. :0)

--Add eggs to a pan that has melted butter and is on medium (lowish-medium) heat.
--Cook (stirring occasionally) until they are partially cooked (Overcooking equals yucky eggs-any brown colour is awful, lol.)

--Make a little nest in the scrabbled eggs and then nestle the yolk into it:

--Add cheese if you like. Finish eggs in the oven (350%) until it reaches desired 'done-ness.' (Be wary of overcooking.)
--Salt and pepper last (keeps eggs fluffier.)

:0) Mel